项目环境搭建
创建react项目
1
| npx creat-react-app cloud-doc
|
安装electron
1
2
3
4
5
6
7
8
9
| cd cloud-doc
npm install electron --save-dev
npm install electron-is-dev --save-dev
npm install -g cnpm --registry=https://registry.npmmirror.com
cnpm install --save-dev electron
cnpm install electron-is-dev --save-dev
|
根目录下新建main.js
1
2
3
4
5
6
7
8
9
10
11
12
13
14
15
16
17
| const {app, BrowserWindow} = require('electron');
const isDev = require('electron-is-dev');
let mainWindow;
app.on('ready', ()=>{
mainWindow = new BrowserWindow({
width: 1026,
height: 680,
webPreferences: {
nodeIntegration: true,
}
});
console.log(isDev);
const urlLocation = isDev ? 'http://localhost:3000' : 'dummyurl';
mainWindow.loadURL(urlLocation);
});
|
修改package.json:
1
2
3
4
5
6
7
| "scripts": {
"start": "react-scripts start",
"build": "react-scripts build",
"test": "react-scripts test",
"eject": "react-scripts eject",
"dev": "electron ."
},
|
运行:
1
2
| npm run start
npm run dev
|
完美的解决方案
运行多个任务,安装concurrently:
1
| npm install concurrently --save-dev
|
解决加载不同步,安装wait-on:
1
| npm install wait-on --save-dev
|
解决跨平台环境变量问题,安装cross-env:
1
| npm install cross-env --save-dev
|
修改package.json:
1
2
3
4
5
6
7
| "scripts": {
"start": "react-scripts start",
"build": "react-scripts build",
"test": "react-scripts test",
"eject": "react-scripts eject",
"dev": "concurrently \"wait-on http://localhost:3000 && electron .\" \"cross-env BROWSER=none npm start\""
},
|
运行启动:
需要使用的关键技术
useState HOOK使用
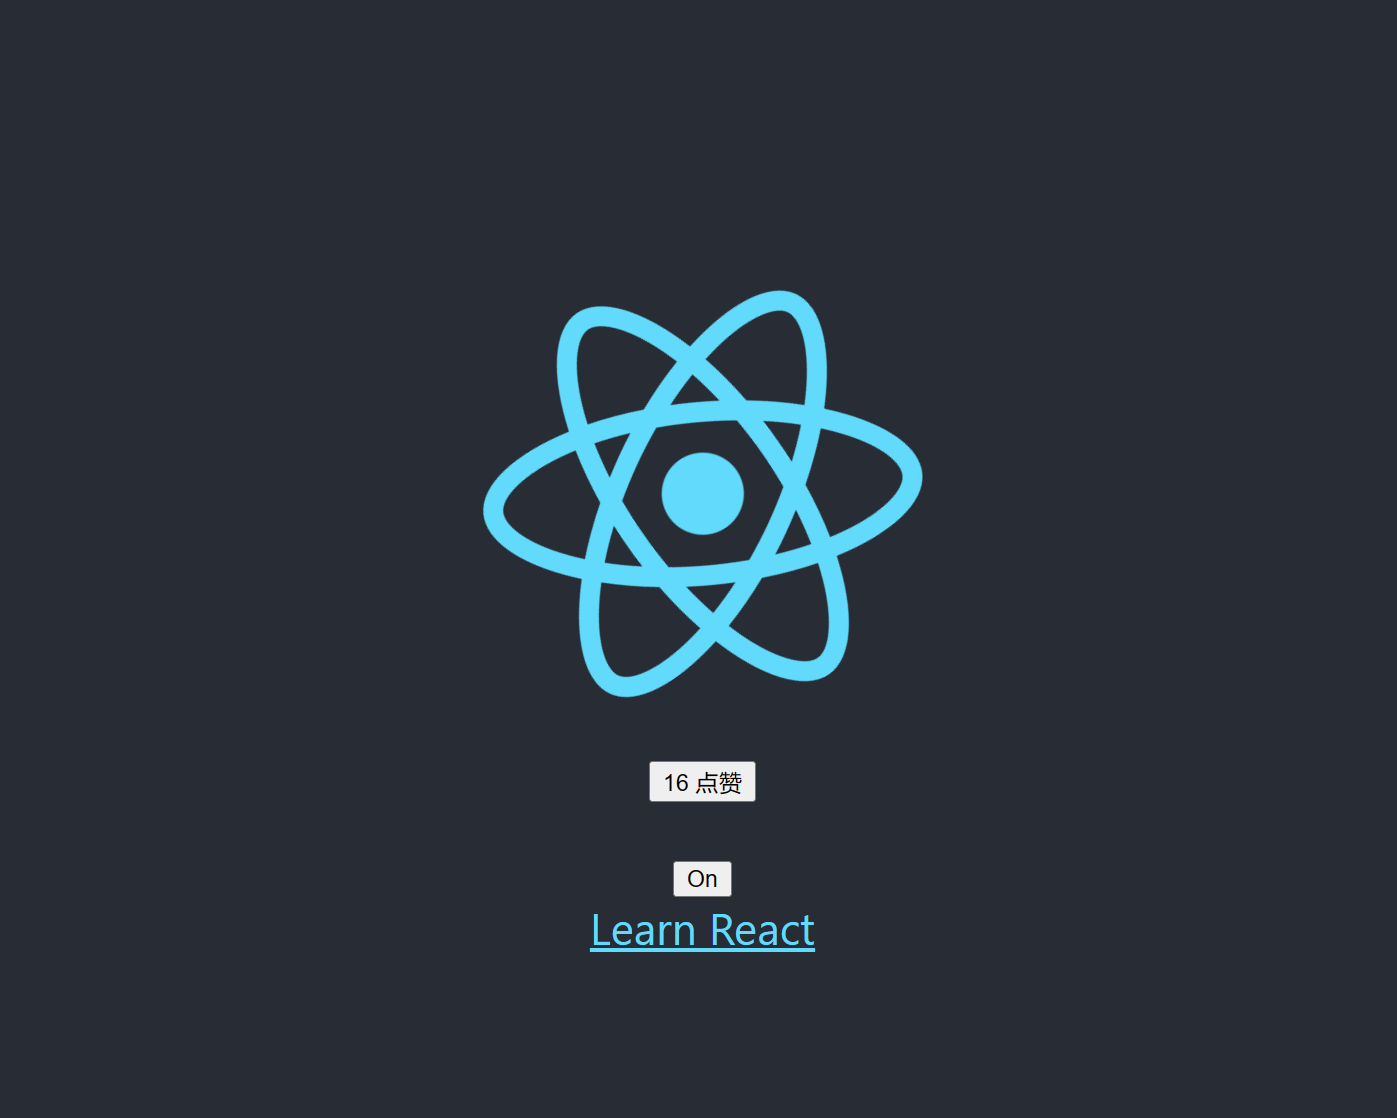
useState 出现,使得 react 无状态组件能够像有状态组件一样,可以拥有自己 state,useState 的参数可以是一个具体的值,也可以是一个函数用于判断复杂的逻辑,函数返回作为初始值。usestate 返回一个数组,数组第一项用于读取此时的 state 值 ,第二项为派发数据更新,组件渲染的函数,函数的参数即是需要更新的值。
使用useState完成一个计数器:
新建一个LikeButton组件;
1
2
3
4
5
6
7
8
9
10
11
12
13
14
15
16
17
18
19
20
21
| import React, { useState } from 'react';
const LikeButton = () => {
const [like, setLike] = useState(0);
const [on, setOn] = useState(true );
return (
<>
<button onClick={() => {
setLike(like + 1 )
}}>
{like} 点赞
</button>
<br />
<button onClick={() => {
setOn(!on)
}}>{on ? 'On' : 'Off'}</button>
</>
);
};
export default LikeButton;
|
显示效果
useEffect HOOK
useEffect的含义:副作用钩子,用于处理组件中的副作用,用来取代生命周期函数。所谓的”副作用”就是指的是组件中状态或生命周期改变时在useEffect可监听到。
如果熟悉class组件中生命周期方法,可以将useEffect视作coponentDidMount、componentDidUpdate和componentWillUnmount的组合体。
useEffect使用的几种方式,根据第二个参数的情况而定
- 无此参数:组件的任何更新,该 useEffect 对应的返回函数和函数都执行;
- 为空数组:只在componentDidMount执行一次,不监听组件的更新;
- 数组中有具体依赖:对应的依赖数据,有变化的时候,才会执行(初始不会执行);
下面代码,根据点赞数量修改title内容
1
2
3
4
5
6
7
8
9
10
11
12
13
14
15
16
17
18
19
20
21
22
23
24
| import React, { useState, useEffect } from 'react';
const LikeButton = () => {
const [like, setLike] = useState(0);
const [on, setOn] = useState(true );
useEffect(()=>{
document.title = `点击了${like}次`;
});
return (
<>
<button onClick={() => {
setLike(like + 1 )
}}>
{like} 点赞
</button>
<br />
<button onClick={() => {
setOn(!on)
}}>{on ? 'On' : 'Off'}</button>
</>
);
};
export default LikeButton;
|
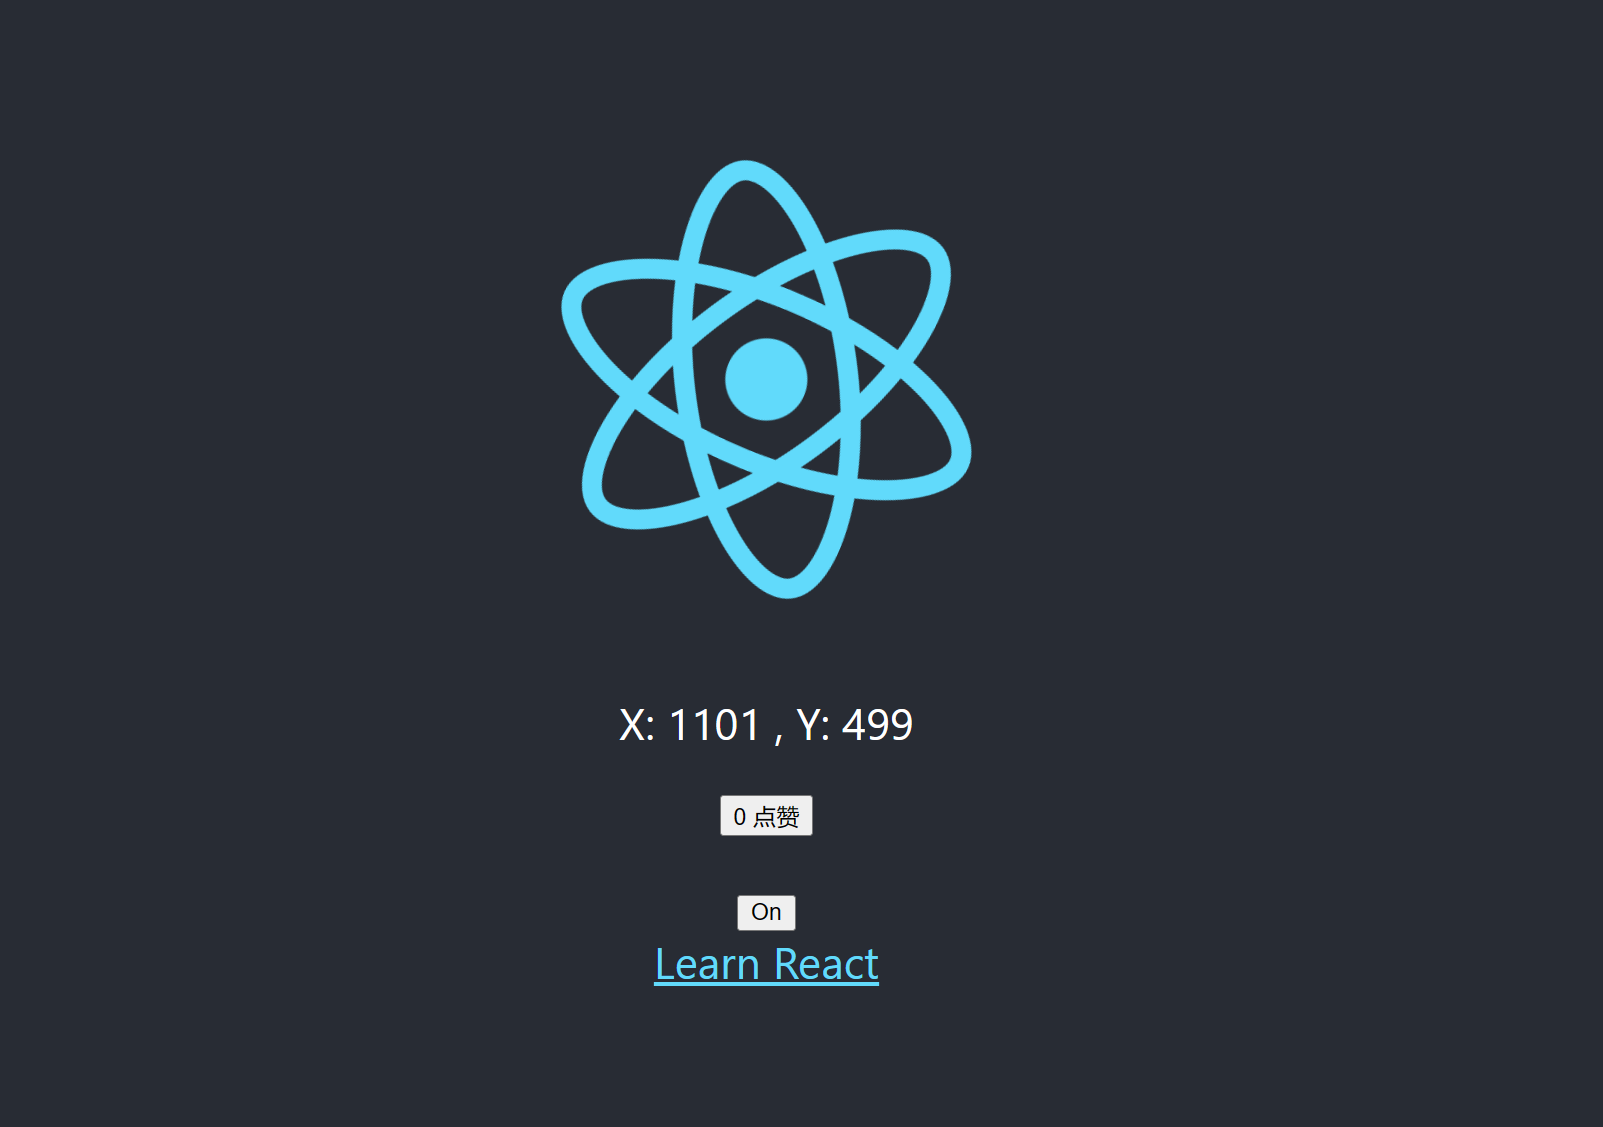
使用useEffect完成一个鼠标跟踪器:
在src/componments下面新建文件MouseTracker.jsx:
1
2
3
4
5
6
7
8
9
10
11
12
13
14
15
16
17
18
19
20
21
22
23
24
25
26
27
| import React, { useState, useEffect } from 'react';
const MouseTracker = () => {
const [postions, setPostions] = useState({
x: 0, y: 0
});
useEffect(()=>{
const updateMouse = (event) => {
console.log('inner');
setPostions({x:event.clientX, y: event.clientY });
};
console.log('add listener');
document.addEventListener('click', updateMouse);
return ()=>{
console.log('remove listener');
document.removeEventListener('click', updateMouse);
};
});
return (
<p>X: {postions.x} , Y: {postions.y}</p>
);
};
export default MouseTracker;
|
引入到主界面:

useEffect可控effect
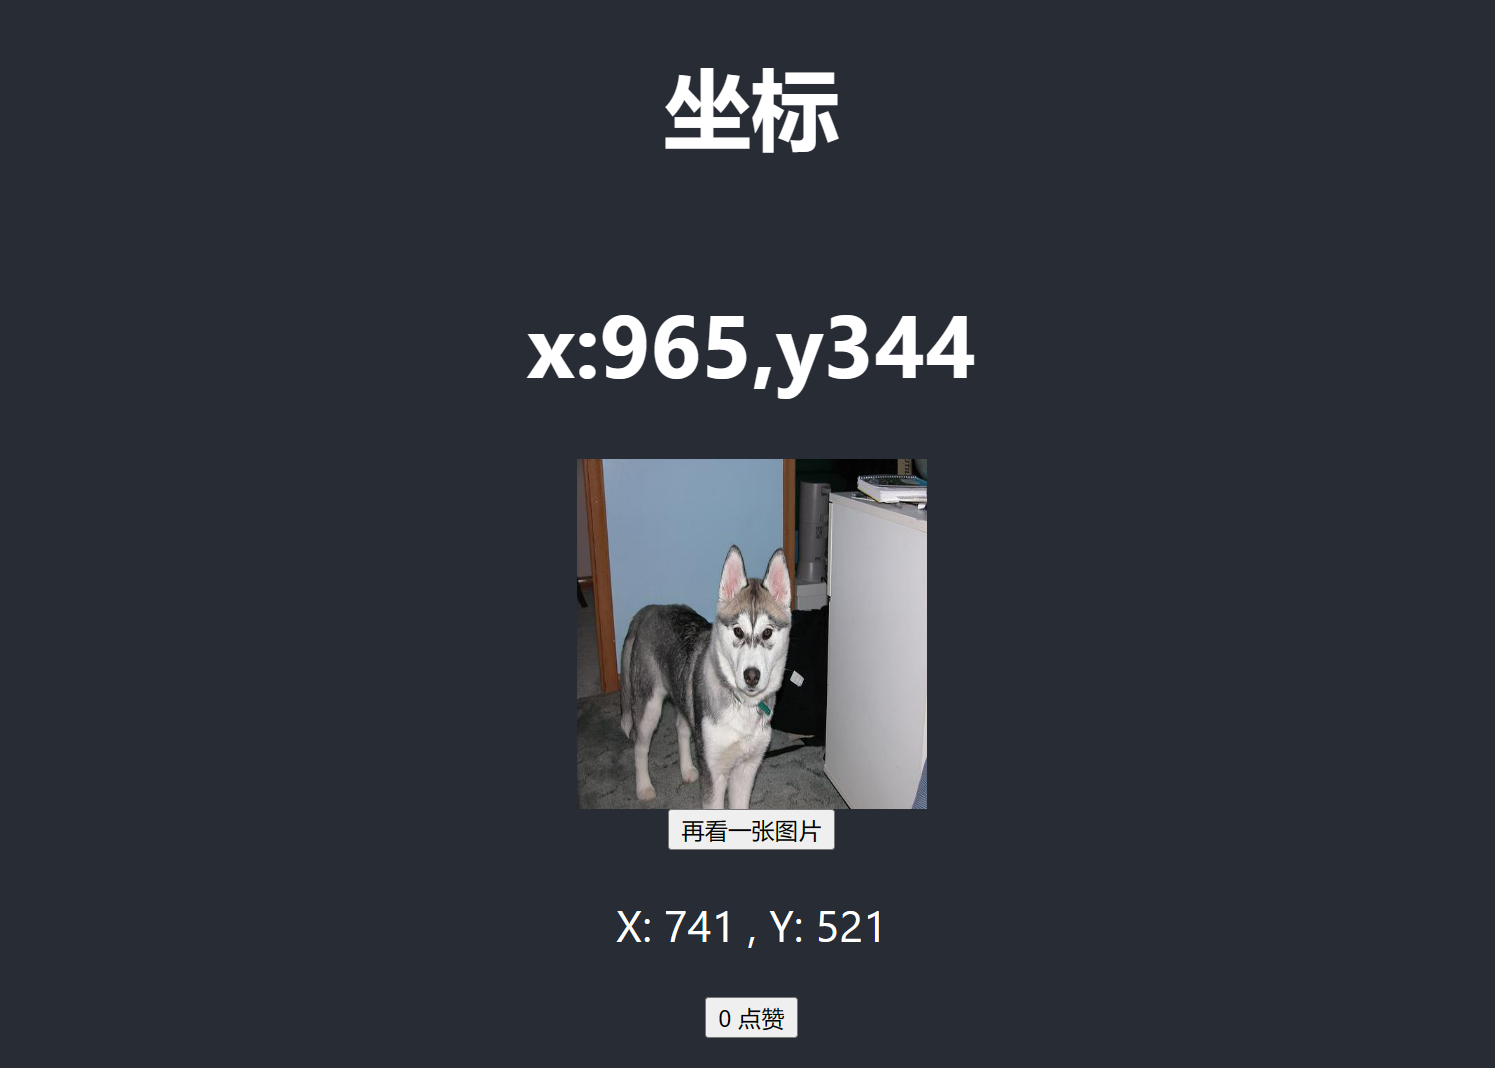
实现狗狗图片展示:
1
2
3
4
5
6
7
8
9
10
11
12
13
14
15
16
17
18
19
20
21
22
23
24
25
26
27
28
29
| import React, { useState, useEffect } from 'react';
import axios from 'axios';
const DogShow = () =>{
const [url, setUrl] = useState('');
const [loading, setLoading] = useState(false);
const [fetch, setFetch] = useState(false);
const style = {
width: 200,
height: 200,
};
useEffect(()=>{
setLoading(true);
axios.get('https://dog.ceo/api/breeds/image/random').then(result => {
console.log(result);
setUrl(result.data.message);
setLoading(false);
});
}, [fetch]);
return (
<>
{loading? <p>图片正在加载...</p>: <img src={url} alt='dog' style={style}></img>}
<button onClick={setFetch}>再看一张图片</button>
</>
)
};
export default DogShow;
|
实现效果:

自定义Hook
将组件逻辑提取到可重用的函数中
1
2
3
4
5
6
7
8
9
10
11
12
13
14
15
16
17
18
19
20
21
22
23
|
import { useState, useEffect } from 'react';
const useMouseTracker = () => {
const [postions, setPostions] = useState({
x: 0, y: 0
});
useEffect(() => {
const updateMouse = (event) => {
setPostions({ x: event.clientX, y: event.clientY });
};
document.addEventListener('mousemove', updateMouse);
return () => {
document.removeEventListener('mousemove', updateMouse);
};
});
return postions;
};
export default useMouseTracker;
|
在App.js中使用:
1
2
3
4
5
6
7
8
9
10
11
12
13
14
15
16
17
18
19
20
21
22
23
24
25
26
27
28
29
30
31
| import logo from './logo.svg';
import './App.css';
import LikeButton from './componments/LikeButton';
import MouseTracker from './componments/MouseTracker';
import DogShow from './componments/DogShow';
import useMousePostion from './hooks/useMouseTracker';
function App() {
const postion = useMousePostion();
return (
<div className="App">
<header className="App-header">
<h1>坐标</h1>
<h1>x:{postion.x},y{postion.y}</h1>
<DogShow/>
<MouseTracker/>
<LikeButton/>
<a
className="App-link"
href="https://reactjs.org"
target="_blank"
rel="noopener noreferrer"
>
Learn React
</a>
</header>
</div>
);
}
export default App;
|
鼠标移动,会显示当前鼠标位置:
HOC Higher order componment
高阶组件:组件重用的模式
高阶组件救赎一个函数,接收一个组件作为函数,返回一个新的组件;
不建议使用;
Hook规则
只在最顶层使用Hook
只在React函数中使用Hook
useHooks.com可以参考Hooks的用法;
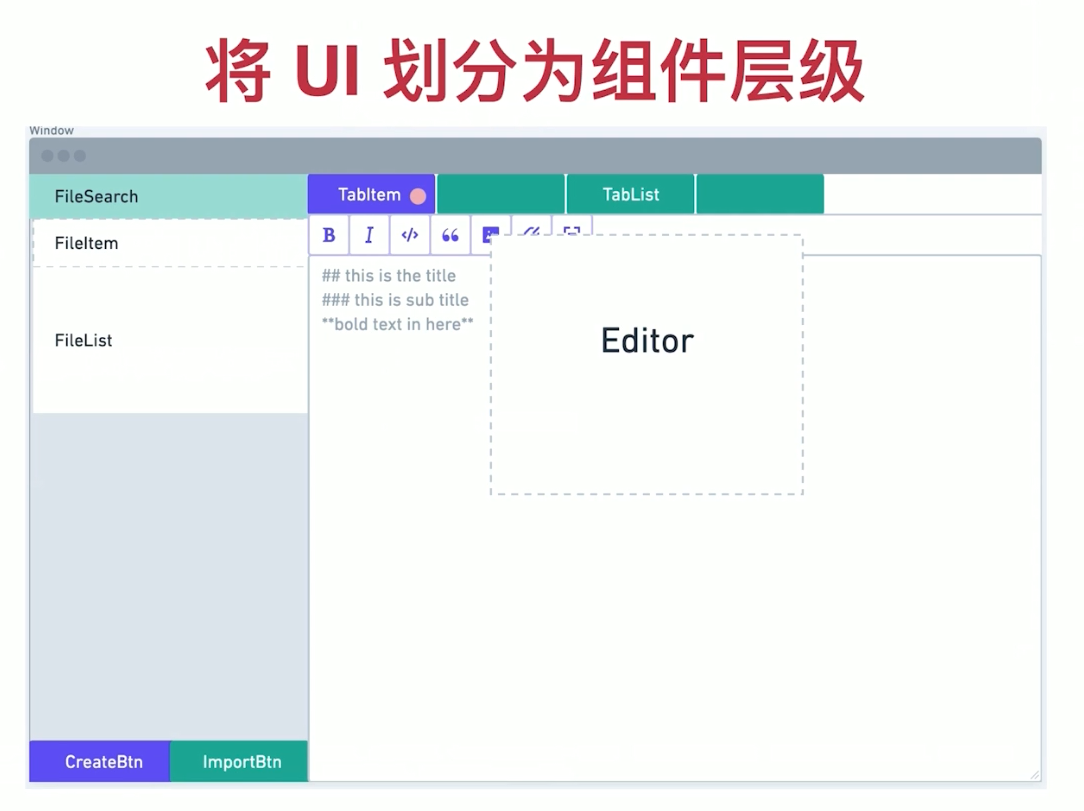
全局需求
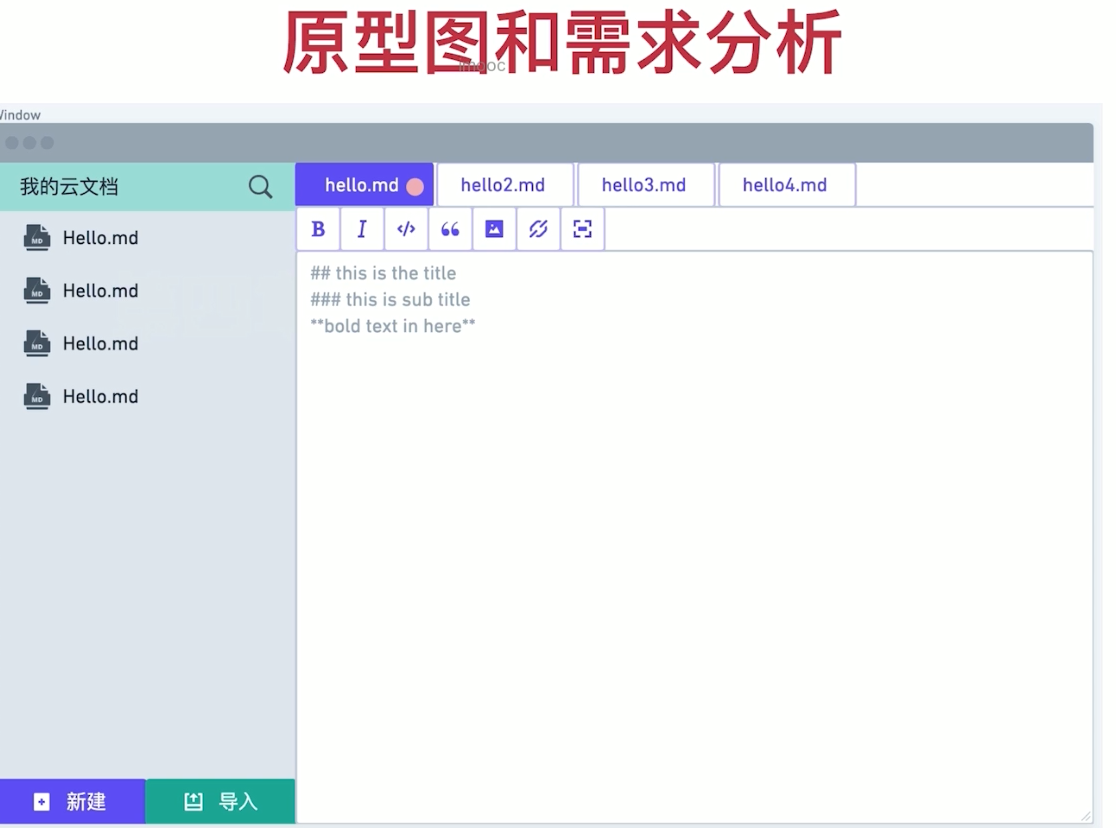

将UI拆分成组件
React哲学
将设计好的UI划分成组件层级
创建应用的静态版本
…
文档结构和代码规范
按照功能组织
按照文件类型组织
注意,不要过度思考,不要层级嵌套;
选择样式库
安装bootstrap
1
| npm install bootstrap --save-dev
|
在App.js中引入:
1
| import 'bootstrap/dist/css/bootstrap.min.css';
|
创建布局:
1
2
3
4
5
6
7
8
9
10
11
12
13
14
15
16
17
18
19
20
21
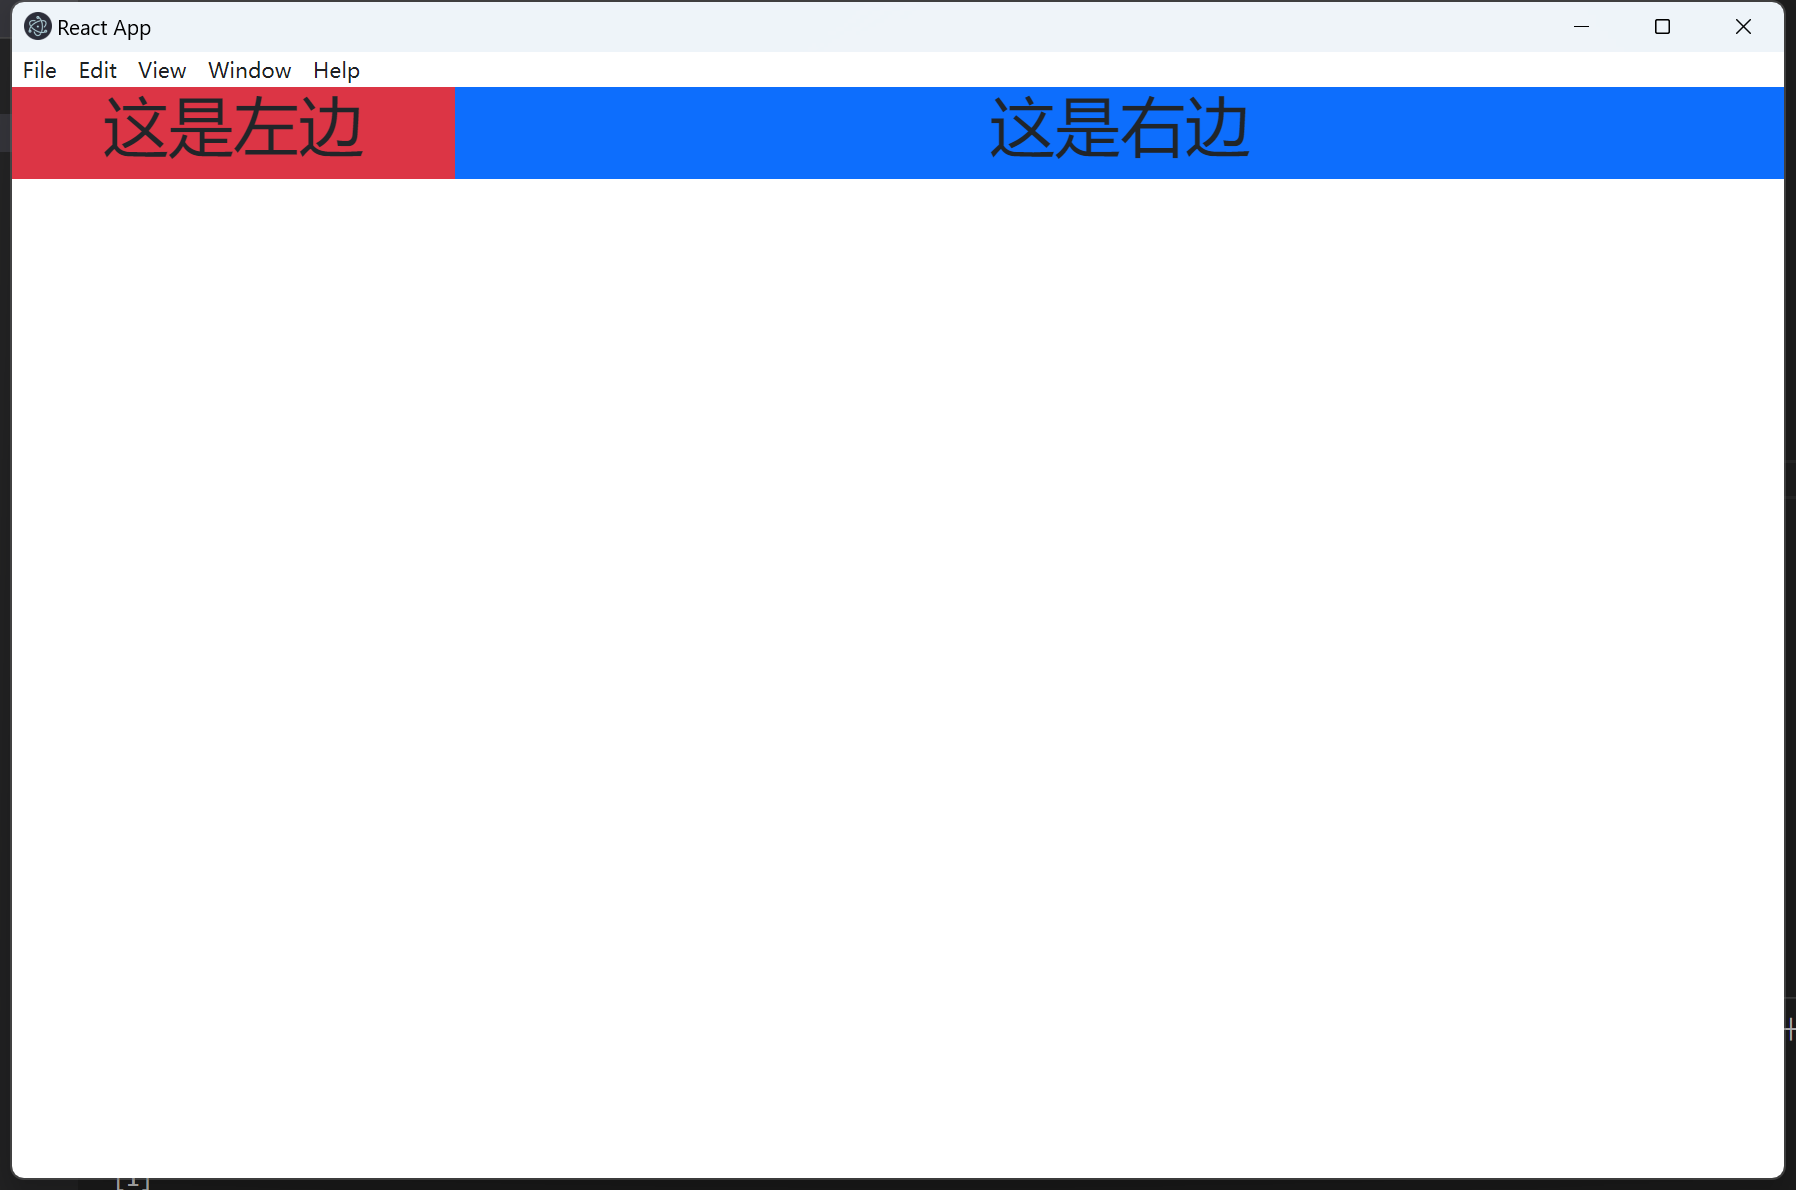
| import './App.css';
import 'bootstrap/dist/css/bootstrap.min.css';
function App() {
return (
<>
<div className='App container-fluid'>
<div className='row'>
<div className='col-3 bg-danger left-panel'>
<h1>这是左边</h1>
</div>
<div className='col-9 bg-primary right-panel'>
<h1>这是右边</h1>
</div>
</div>
</div>
</>
);
}
export default App;
|
左侧面板开发
分析文件搜索组件属性
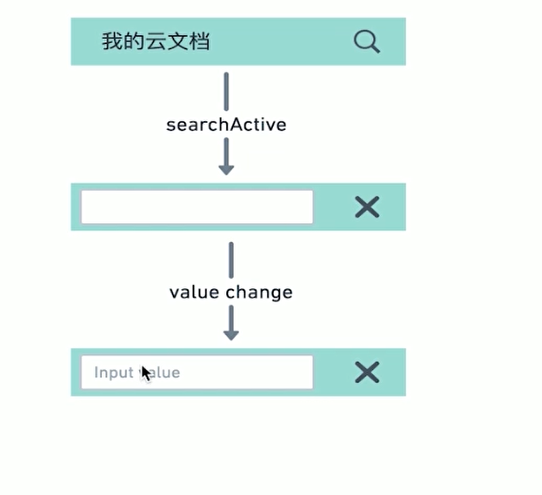
默认状态-搜索状态-搜索值改变的状态;
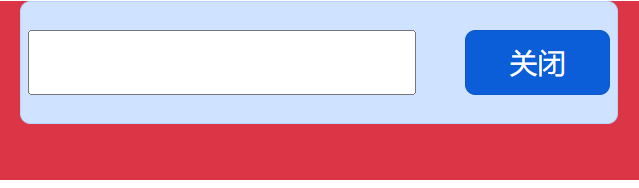
创建FileSearch组件
1
2
3
4
5
6
7
8
9
10
11
12
13
14
15
16
17
18
19
20
21
22
23
24
25
26
27
28
29
30
31
32
33
34
35
|
import React, { useState } from "react";
const FileSearch = ({ title, onFileSearch }) => {
const [inputActive, setInputActive] = useState(false);
const [value, setValue] = useState('')
return (
<div className="alert alert-primary">
{!inputActive &&
<div className="d-flex justify-content-between align-items-center">
<span>{title}</span>
<button
type="button"
className="btn btn-primary"
onClick={() => { setInputActive(true) }}>搜索</button>
</div>
}
{inputActive &&
<div className="row d-flex justify-content-between">
<input
value={value}
onChange={(e)=>{setValue(e.target.value)}}
className="col-8">
</input>
<button
type="button"
className="btn btn-primary col-3"
onClick={() => { setInputActive(false); setValue('') }}>关闭</button>
</div>
}
</div>
);
};
export default FileSearch;
|

添加键盘响应(Esc+Esc)事件
使用useRef完成
1
2
3
4
5
6
7
8
9
10
11
12
13
14
15
16
17
18
19
20
21
22
23
24
25
26
27
28
29
30
31
32
33
34
35
36
37
38
39
40
41
42
43
44
45
46
47
48
49
50
51
52
53
54
55
56
57
58
59
60
61
62
63
64
65
66
67
| import React, { useState, useEffect, useRef } from "react";
const FileSearch = ({ title, onFileSearch }) => {
const [inputActive, setInputActive] = useState(false);
const [value, setValue] = useState('')
let node = useRef(null)
const closeSearch = (e) => {
e.preventDefault();
setInputActive(false);
setValue('');
}
useEffect(() => {
const hanldeInputEvent = (event) => {
const {keyCode} = event;
if (keyCode === 13 && inputActive) {
onFileSearch(value);
} else if (keyCode === 27 && inputActive) {
closeSearch(event);
}
};
document.addEventListener('keyup', hanldeInputEvent);
return () => {
document.removeEventListener('keyup', hanldeInputEvent);
};
});
useEffect(() =>{
if(inputActive){
node.current.focus()
}
}, [inputActive]);
return (
<div className="alert alert-primary">
{!inputActive &&
<div className="d-flex justify-content-between align-items-center">
<span>{title}</span>
<button
type="button"
className="btn btn-primary"
onClick={() => { setInputActive(true) }}>搜索</button>
</div>
}
{inputActive &&
<div className="row d-flex justify-content-between">
<input
value={value}
ref={node}
onChange={(e) => { setValue(e.target.value) }}
className="col-8">
</input>
<button
type="button"
className="btn btn-primary col-3"
onClick={closeSearch}>关闭</button>
</div>
}
</div>
);
};
export default FileSearch;
|
为项目选择图标库
使用svg图标库,而不是font icon
使用fontawesome react
安装:
1
2
| npm i --save @fortawesome/react-fontawesome
npm i --save @fortawesome/free-solid-svg-icons
|
使用:
1
2
3
4
5
6
7
| import { FontAwesomeIcon } from "@fortawesome/react-fontawesome";
import { faSearch, faClose } from "@fortawesome/free-solid-svg-icons";
...
<FontAwesomeIcon size="md" title="搜索" icon={faSearch} />
...
|